Hustler Raptor Drive Belt Diagram – Complete Guide
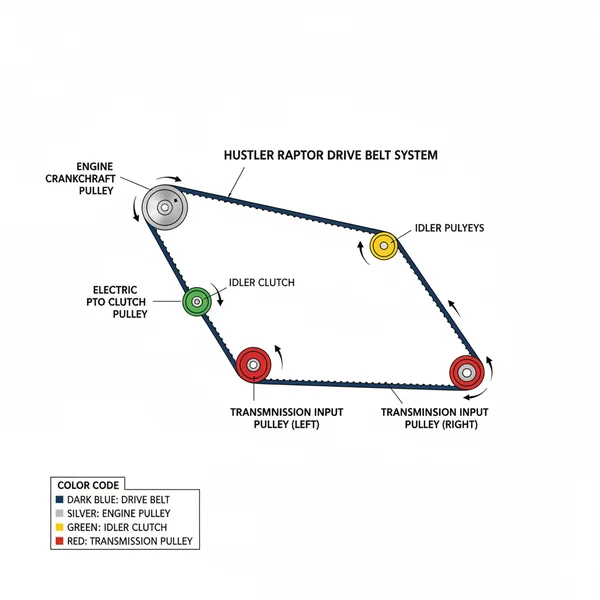
The Hustler Raptor drive belt diagram visually illustrates the component layout of the mower’s drive system, showing belt routing around pulleys and tensioners. It’s crucial for understanding the system’s configuration, aiding in correct belt replacement, tension adjustment, and overall maintenance to ensure optimal mower performance.
📌 Key Takeaways
- Main purpose of this diagram is to visualize the precise routing and component structure of the drive belts for your Hustler Raptor mower.
- The most important component to identify are the various pulleys and idlers, as their correct configuration determines belt tension and function.
- Always ensure the engine is off and spark plug disconnected before working on the drive belt system for safety.
- A practical application tip is to always compare your mower’s current belt layout to the diagram before purchasing replacements or making adjustments.
- Use this diagram whenever performing routine maintenance, troubleshooting drive issues, or replacing worn drive belts.
Hustler Raptor Drive Belt Diagram – Complete Guide
Welcome to your definitive resource for understanding the Hustler Raptor drive belt diagram. If you own a Hustler Raptor zero-turn mower, you know how crucial its drive system is for peak performance. This comprehensive guide is specifically designed to demystify the complex web of belts, pulleys, and components that power your machine. Whether you’re a seasoned DIY enthusiast or a newcomer to mower maintenance, you’ll learn exactly how to read and interpret your Hustler Raptor drive belt diagram, identify key parts, troubleshoot common issues, and perform proper maintenance. Get ready to gain the confidence needed to keep your Hustler Raptor running smoothly, ensuring reliable operation season after season.
Understanding Your Hustler Raptor Drive Belt Diagram
The Hustler Raptor drive belt diagram is an essential visual aid that illustrates the precise routing and configuration of the belts within your mower’s drive system. This diagram serves as a blueprint, showing the intricate path the drive belts take around various pulleys, idlers, and tensioners, connecting the engine to the transmission and often the cutting deck. It’s more than just lines and circles; it represents the operational structure and mechanical layout of your mower’s propulsion and power delivery system.
Typically, a comprehensive diagram will feature distinct labels for each critical component. You’ll often see the engine pulley, hydrostatic transmission pulleys, idler pulleys (both fixed and tensioning), and the drive shaft connecting them. Some diagrams might use different line styles or colors to differentiate between the main drive belt (which powers the wheels) and the deck belt (which powers the blades), if both are shown on the same schematic. Pay close attention to any arrows indicating the direction of rotation, which are vital for correct belt installation. While the fundamental system remains consistent, minor variations in the specific configuration might exist between different sub-models or production runs of the Hustler Raptor series. Always consult the diagram specific to your mower’s serial number for the most accurate information. This attention to detail ensures you’re working with the exact blueprint for your machine.
Before starting any work, always locate your mower’s specific model and serial number. This ensures you find the exact drive belt diagram and correct replacement parts tailored to your Hustler Raptor.
Step-by-Step Guide: Reading and Interpreting Your Diagram for Belt Installation

Interpreting your Hustler Raptor drive belt diagram is a critical skill for any owner. This step-by-step guide will walk you through understanding its intricacies, preparing for a belt replacement, and successfully installing a new drive belt. Always prioritize safety and gather the necessary tools before you begin.
Before performing any maintenance, always disengage the power take-off (PTO), set the parking brake, remove the ignition key, and disconnect the spark plug wires to prevent accidental engine starting. Belts and pulleys can cause severe injury.
Tools and Materials Needed:
- ✓ New Hustler Raptor drive belt (ensure correct part number)
- ✓ Socket set and wrenches (various sizes, typically metric)
- ✓ Pliers
- ✓ Pry bar or large screwdriver (for tensioner release)
- ✓ Floor jack and jack stands (for safe lifting, if required for access)
- ✓ Camera or smartphone (for documenting current belt routing)
- ✓ Safety glasses and gloves
Installation Steps:
- 1. Prepare Your Mower: Ensure the mower is on a flat, stable surface. Engage the parking brake. For optimal access to the drive system, you may need to lift the rear of the mower using a floor jack and secure it with jack stands. Remove the deck if necessary, as this often provides better access to the drive belts, particularly on models where the drive belt runs under or near the deck structure.
- 2. Study the Diagram Thoroughly: Before touching anything, carefully examine your Hustler Raptor drive belt diagram. Identify the engine pulley, the hydrostatic transmission pulleys (one for each drive wheel), the idler pulleys, and the belt tensioner. Note the exact path the belt takes, particularly how it interacts with the grooved and flat surfaces of the pulleys. Take photos of your existing belt’s routing as an additional reference.
- 3. Release Belt Tension: Locate the belt tensioner assembly. This usually involves a spring-loaded idler pulley. Use a wrench or pry bar to pivot the tensioner arm, thereby slackening the belt. Secure the tensioner in the “released” position if possible, often by pinning it or holding it. This step is crucial for safe belt removal and installation.
- 4. Remove the Old Belt: Once the tension is released, carefully unthread the old drive belt from all the pulleys, starting with the easiest access points. Inspect the old belt for wear patterns; this can provide clues about potential issues with pulley alignment or worn components.
- 5. Inspect Pulleys and Components: With the old belt removed, take this opportunity to thoroughly inspect all pulleys, idlers, and the tensioner mechanism. Check for signs of wear, cracks, excessive wobble, or seized bearings. Spin each pulley by hand to ensure it rotates freely and smoothly. Address any issues before installing the new belt, as worn components can quickly damage a new belt.
- 6. Install the New Belt: Following your Hustler Raptor drive belt diagram precisely, begin routing the new belt. Start by placing the belt around the engine pulley, then work your way around the transmission pulleys, and finally thread it around the idler pulleys. Ensure the belt sits correctly in all grooves and that no twists are present. This step requires patience and careful adherence to the diagram’s layout.
- 7. Reapply Belt Tension: Once the new belt is fully routed according to the diagram’s configuration, slowly release the tensioner arm. The tensioner spring should pull the idler pulley firmly against the belt, providing the correct operating tension. Double-check that the belt remains properly seated on all pulleys as tension is applied.
- 8. Final Inspection and Test: Rotate the pulleys by hand to confirm the belt moves freely without binding. Re-engage spark plug wires. Start the engine briefly (with the PTO disengaged and mower on stands if lifted) to observe the belt’s movement. Listen for unusual noises and ensure smooth operation. Turn off the engine, then lower the mower if it was lifted. Perform a slow, cautious test drive to ensure proper functionality of the drive system.
Common Issues & Troubleshooting with Your Hustler Raptor Drive System

Even with a reliable Hustler Raptor, drive belt issues can arise. Understanding common problems and how your Hustler Raptor drive belt diagram can help diagnose them is invaluable for effective troubleshooting. The diagram acts as your first line of defense in identifying misrouted belts or missing components, which are common culprits for performance problems.
Frequent problems include belts slipping, shredding, or premature wear. A slipping belt often indicates insufficient tension, which could be due to a faulty tensioner spring or an incorrect belt length. Shredding or rapid wear typically points to misalignment of pulleys, seized idler bearings, or foreign objects getting caught in the drive system. If you notice your mower losing power, making unusual noises (like squealing or grinding), or failing to move properly, the drive belt system is a primary area to investigate.
Do not attempt to operate your mower with a damaged or improperly routed drive belt. This can lead to further mechanical damage, costly repairs, and potential safety hazards.
When troubleshooting, refer back to your Hustler Raptor drive belt diagram to compare the actual belt layout with the intended structure. Check if the belt is correctly seated in all pulley grooves. Look for bent belt guides or debris that might impede the belt’s path. If a belt repeatedly fails shortly after replacement, it’s a strong indicator of an underlying issue with a pulley, bearing, or tensioner that needs attention. While many issues can be resolved with the help of the diagram, if you’re unsure about the diagnosis or repair, especially with complex hydraulic systems, it’s always best to consult a certified Hustler service technician.
Tips & Best Practices for Hustler Raptor Drive Belt Longevity
Maximizing the lifespan of your Hustler Raptor drive belt involves a combination of diligent maintenance and smart operational habits. By following these tips and best practices, you can reduce wear, prevent premature failures, and ensure your mower’s drive system remains efficient and reliable.
Always keep a spare drive belt on hand, especially during peak mowing season. Knowing your part number and having a backup can save you significant downtime when a belt eventually fails.
Maintenance Recommendations:
- ✓ Regular Inspection: Periodically check the drive belts for cracks, fraying, glazing, or missing chunks. Pay attention to the grooves, as these can wear down over time. A good rule of thumb is to inspect them every 25-50 operating hours or monthly during active use.
- ✓ Keep it Clean: Regularly remove grass clippings, dirt, and debris from around the pulleys and belts. Accumulations can cause friction, heat, and premature wear. Use compressed air or a brush for thorough cleaning.
- ✓ Check Pulley Alignment: Ensure all pulleys are properly aligned. Misalignment causes uneven wear and can lead to belts jumping off or failing prematurely. While not always adjustable, identifying a misaligned pulley can indicate a bent shaft or worn mounting hardware.
- ✓ Inspect Tensioner Function: Verify that the belt tensioner operates freely and applies consistent tension to the belt. A weak tensioner spring or a seized pivot point will lead to belt slippage and reduced performance.
- ✓ Use OEM or High-Quality Aftermarket Belts: While cheaper alternatives exist, investing in original equipment manufacturer (OEM) belts or reputable high-quality aftermarket options is crucial. These belts are designed to precise specifications regarding length, width, and material composition, ensuring optimal performance and durability within your Hustler Raptor’s drive configuration. Inferior belts often stretch, crack, or fail prematurely under the demanding conditions of a zero-turn mower.
Cost-Saving Advice:
Preventative maintenance is the ultimate cost-saver. By regularly inspecting and addressing minor issues, you can prevent costly breakdowns and extend the life of your drive belts and associated components. Keeping your mower clean and operating it within its recommended capabilities (avoiding excessively tall grass or uneven terrain that strains the drive system) will also contribute significantly to belt longevity. When replacing belts, always replace all worn-out components – a new belt on a worn pulley will still lead to short belt life.
Conclusion
Mastering the intricacies of your Hustler Raptor drive belt diagram empowers you to perform essential maintenance, diagnose issues, and ensure the peak performance of your zero-turn mower. By understanding the structure, layout, and proper configuration of the drive belt system, you can extend the life of your equipment and enjoy uninterrupted mowing seasons.
Remember, proactive care, meticulous adherence to the diagram during installation, and using high-quality replacement parts are the cornerstones of effective mower maintenance. Take pride in knowing you have the knowledge to maintain this vital aspect of your Hustler Raptor. With this comprehensive guide and your specific Hustler Raptor drive belt diagram in hand, you are well-equipped to tackle any drive belt challenge that comes your way, keeping your mower productive and reliable.
Frequently Asked Questions
What is Hustler Raptor drive belt diagram?
A Hustler Raptor drive belt diagram is a visual representation detailing the component layout and routing of the drive belts within your mower’s system. It shows the exact configuration of pulleys, tensioners, and belts, which is essential for proper installation and maintenance. Understanding this structure helps ensure your mower operates efficiently and safely.
How do you read Hustler Raptor drive belt diagram?
To read a Hustler Raptor drive belt diagram, start by identifying the engine and deck pulleys. Follow the lines representing the belts to trace their path around each component, noting any directional arrows. Pay attention to the overall system layout and tensioner positions, as this structure reveals how power is transmitted through the mower’s drive configuration.
What are the parts of Hustler Raptor drive belt system?
The Hustler Raptor drive belt system consists of several key components: the engine pulley, deck pulleys, idler pulleys (both fixed and spring-loaded tensioners), and the drive belts themselves. Each component plays a vital role in transmitting power from the engine to the mower deck or wheels, forming an interconnected structure essential for the mower’s operation.
Why is the drive belt important?
The drive belt is crucial because it transmits power from the engine to either the mower blades or the wheels, depending on its specific system configuration. Without a properly functioning drive belt, the mower cannot cut grass or move. Its integrity ensures the entire component system operates as designed, maintaining efficiency and preventing mechanical failures.
What is the difference between primary and secondary drive belts?
A primary drive belt typically connects the engine to the main drive shaft or clutch, initiating power transfer for the overall system. A secondary drive belt then takes that power and distributes it to specific components, like the mower deck or hydraulic pumps, forming a complex layout. This configuration allows for different functions to be engaged independently within the mower’s structure.
How do I use Hustler Raptor drive belt diagram?
You use the Hustler Raptor drive belt diagram to accurately identify the routing and configuration of your mower’s belts. It’s invaluable for replacing old or broken belts, verifying correct tensioner placement, and troubleshooting operational issues. By understanding the system’s layout and component interaction, you ensure proper maintenance and prolong your mower’s lifespan.