Ford Fusion Serpentine Belt Diagram – Complete Guide
The Ford Fusion serpentine belt diagram illustrates the correct routing path for the single belt that drives accessories like the alternator, power steering pump, and A/C compressor. It’s crucial for correct installation during replacement, helping to avoid issues like a check engine light due to accessory malfunction or triggering a diagnostic code.
📌 Key Takeaways
- Illustrates correct routing for all accessory belt components.
- The automatic tensioner pulley is most important for proper belt tension.
- Ensure the engine is off and cool before attempting any belt work.
- Take a clear photo of the existing belt routing before removal as a reference.
- Use this diagram during belt replacement or when diagnosing squealing or slipping belts.
Ford Fusion Serpentine Belt Diagram – Complete Guide
If you own a 2012 Ford Fusion, understanding its serpentine belt routing is crucial for routine maintenance and unexpected repairs. This essential component drives multiple accessories, from the alternator to the power steering pump. Without a clear diagram, replacing or inspecting your belt can be a frustrating and confusing task. This comprehensive guide provides you with a detailed 2012 Ford Fusion serpentine belt diagram, breaking down each component and offering step-by-step instructions. By the end of this article, you will have the knowledge to confidently interpret the diagram and ensure your Fusion operates smoothly and reliably.
Understanding Your Ford Fusion Serpentine Belt Diagram
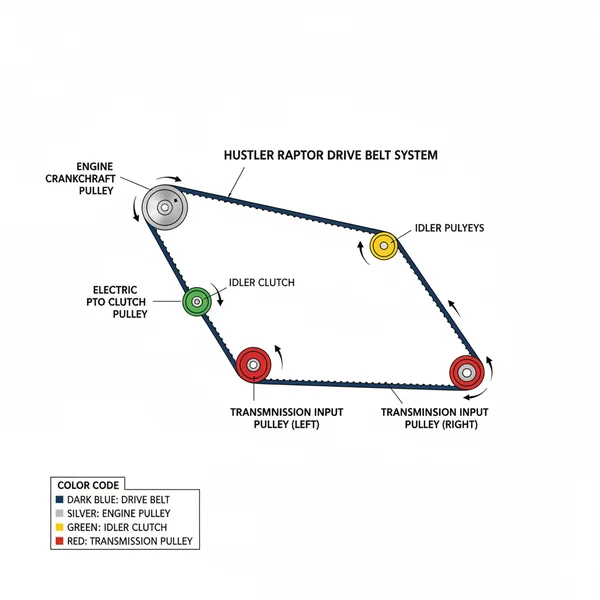
The serpentine belt, also known as the accessory belt, is a single, continuous belt that transfers power from your engine’s crankshaft to various peripheral components. For your 2012 Ford Fusion, the specific routing of this belt is determined by your engine type (e.g., 2.5L I4 or 3.0L V6). While the fundamental purpose remains the same, the path and number of pulleys can vary. The diagram you’ll reference will clearly illustrate the precise route, showing which side of the belt contacts each pulley – either the grooved side or the smooth (backside) side.
Key components typically found on a 2012 Ford Fusion serpentine belt diagram include the crankshaft pulley (the primary drive pulley), the automatic belt tensioner (which maintains proper belt tension), and several idler pulleys that help guide the belt. Other driven accessories might include the alternator (charging system), the air conditioning (AC) compressor, and potentially a power steering pump. Some models may also drive the water pump via the serpentine belt, directly impacting coolant flow for engine temperature regulation. Each pulley is represented, often with arrows indicating the belt’s direction of travel. Pay close attention to these details as incorrect routing can lead to immediate belt failure or damage to accessories.
The serpentine belt is distinct from the timing chain (or timing belt on some engines), which synchronizes the engine’s internal components. The serpentine belt manages external accessories, while the timing chain handles critical engine valve timing.
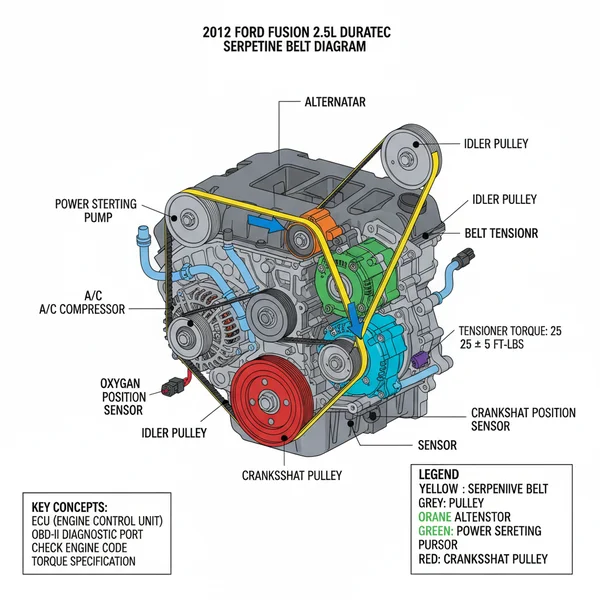
(Imagine a clear, labeled diagram of a 2012 Ford Fusion serpentine belt routing here, showing pulleys for crankshaft, tensioner, idlers, alternator, AC compressor, and water pump, with arrows indicating belt direction. Different colored lines could denote grooved vs. smooth belt contact.)
Step-by-Step Guide: How to Read and Interpret Your Diagram

Understanding your 2012 Ford Fusion serpentine belt diagram is key to successful maintenance. Follow these steps to correctly interpret the routing for inspection or replacement:
- ✓ Step 1: Identify Your Engine Type. Before anything else, confirm whether your 2012 Ford Fusion has the 2.5L 4-cylinder or the 3.0L V6 engine. The belt routing will differ significantly between these configurations. Consult your owner’s manual or vehicle identification number (VIN) for confirmation.
- ✓ Step 2: Locate the Crankshaft Pulley. This is the largest pulley at the bottom, directly driven by the engine. It’s the starting point for tracing the belt’s path. All other components receive power from here.
- ✓ Step 3: Pinpoint the Automatic Belt Tensioner. This component is critical for maintaining correct belt tension. On the diagram, it usually has an arrow indicating the direction you need to pivot it (typically with a wrench or specialized tool) to release tension for belt removal or installation.
- ✓ Step 4: Identify Driven Accessories. Locate the alternator, AC compressor, and any power steering pump or water pump. Note which side of the belt (grooved or smooth) contacts each pulley. Diagrams often use different line styles or colors to differentiate this. For instance, the ribbed side of the belt typically drives the alternator and AC compressor, while the smooth back of the belt might wrap around an idler pulley or the water pump.
- ✓ Step 5: Trace the Full Path. Starting from the crankshaft pulley, follow the belt’s path around each component, ensuring you note the correct contact surface (grooved or smooth) for every pulley. The diagram’s arrows will guide you on the belt’s direction of rotation. It is essential to replicate this exact path when installing a new belt.
- ✓ Step 6: Prepare Tools and Safety Gear. If you’re undertaking a belt replacement, gather the necessary tools: typically a serpentine belt tool (or a long breaker bar/ratchet for the tensioner), possibly a socket set, and eye protection and gloves for safety. Always ensure the engine is off and cool before beginning any work.
Never attempt to remove or install a serpentine belt on a hot or running engine. Moving parts can cause severe injury. Always wear appropriate personal protective equipment, including safety glasses and gloves.
Common Issues & Troubleshooting

Understanding your 2012 Ford Fusion serpentine belt diagram isn’t just for installation; it’s invaluable for troubleshooting. Many common issues can be quickly diagnosed by inspecting the belt’s condition and routing.
The most frequent problem is a squealing belt. This often indicates a loose belt (though your automatic tensioner should prevent this if functioning correctly), a worn belt, or a misaligned pulley. Referencing the diagram can help you verify correct routing and check for any accessory belt misalignment. Cracks, fraying, or missing ribs on the belt are clear signs it needs replacement. If a belt breaks, all accessories it drives will cease functioning. This means loss of power steering, no AC, and critically, your alternator will stop charging the battery.
In some cases, a failing accessory driven by the belt (like a seized AC compressor or alternator bearing) can cause the belt to wear prematurely or even snap. If the alternator fails, you might see a battery warning light on your dashboard, and prolonged driving could lead to your vehicle’s ECU (Engine Control Unit) logging a diagnostic code related to low voltage or charging system errors, retrievable with an OBD-II scanner. While the diagram helps visualize the mechanical components, these electronic warnings can point you towards the affected accessory.
If your serpentine belt breaks, immediately pull over to a safe location and shut off your engine. Continuing to drive without a belt can lead to engine overheating (if the water pump is driven by it), battery discharge, and potential damage to other engine components.
Tips & Best Practices for Your Ford Fusion Serpentine Belt
Maintaining your 2012 Ford Fusion’s serpentine belt properly can save you time, money, and hassle in the long run. Here are some pro tips and best practices:
Before removing an old belt, take a quick photo of the existing routing with your smartphone. This serves as an immediate, real-world diagram backup, especially helpful if your printed diagram isn’t perfectly clear or if there are minor variations.
- ✓ Regular Inspection: Visually inspect your serpentine belt every 12,000 to 15,000 miles, or at every oil change. Look for cracks, glazing, fraying, or material loss. Pay attention to the grooves for signs of wear.
- ✓ Check Pulleys: While inspecting the belt, check all pulleys for excessive play, wobbling, or grinding noises. A faulty idler pulley or tensioner can cause premature belt wear and squealing. The automatic tensioner should maintain consistent tension; if it feels loose or stiff, it may need replacement.
- ✓ Use Quality Components: When replacing your belt, invest in a high-quality aftermarket or OEM (Original Equipment Manufacturer) belt. Cheaper belts may not last as long or provide optimal performance. If replacing the tensioner or idler pulleys, also opt for reputable brands.
- ✓ Proper Torque Spec: If you remove any bolts to access the belt or pulleys, ensure you re-tighten them to the manufacturer’s specified torque spec. Over-tightening can strip threads, and under-tightening can lead to components loosening or falling off.
- ✓ Address Warnings Promptly: If you experience a check engine light or other warning indicators related to your accessory systems, have them diagnosed promptly using an OBD-II scanner. A diagnostic code can pinpoint issues that might affect or be affected by your serpentine belt.
Mastering the 2012 Ford Fusion serpentine belt diagram empowers you to tackle maintenance with confidence. By understanding its routing and the function of each component, you can ensure your Ford Fusion’s essential accessories continue to operate reliably for years to come.
Frequently Asked Questions
What is a serpentine belt diagram?
A serpentine belt diagram for a Ford Fusion visually maps the path of the single belt that powers essential engine accessories. It shows how the belt snakes around various pulleys, including the alternator, water pump, and A/C compressor. This diagram is indispensable for correctly reinstalling the belt after replacement or during routine maintenance, helping to prevent a check engine light.
How do you read a serpentine belt diagram?
To read a Ford Fusion serpentine belt diagram, identify the crankshaft pulley, which is usually the largest and central. Then, trace the belt’s path around the various accessory pulleys (alternator, power steering, A/C compressor, water pump) and idler/tensioner pulleys. Pay attention to directional arrows and the smooth vs. grooved sides of the belt contact for proper alignment.
What are the parts of a serpentine belt system?
The Ford Fusion serpentine belt system includes the serpentine belt itself, the crankshaft pulley, and various accessory pulleys like the alternator, power steering pump, water pump, and A/C compressor. Crucially, it also features an automatic tensioner pulley and often one or more idler pulleys, which guide the belt and maintain optimal tension to prevent issues that might trigger a diagnostic code.
Why is the tensioner pulley important?
The tensioner pulley is vital for the Ford Fusion serpentine belt system because it maintains constant, correct tension on the belt. This prevents slippage, which can lead to accessory malfunction and potentially trigger a check engine light. A failing tensioner can cause squealing noises, premature belt wear, and even thrown belts, impacting all belt-driven systems controlled by the ECU.
What is the difference between a serpentine belt and a timing belt?
A serpentine belt on a Ford Fusion drives external accessories like the alternator and A/C, and is generally visible and easier to replace. A timing belt, however, is internal, synchronizing the crankshaft and camshafts to ensure engine valves open and close at the correct times. A timing belt failure is catastrophic, while a serpentine belt failure often results in loss of accessories and a possible diagnostic code via OBD-II.
How do I use a serpentine belt diagram?
Use a Ford Fusion serpentine belt diagram to accurately route a new belt during replacement. First, loosen the tensioner to remove the old belt. Then, carefully follow the diagram to snake the new belt around all pulleys, ensuring it sits correctly in grooves. Finally, release the tensioner to secure the belt. This prevents accessory issues and potential check engine light activations.