Walk-In Shower Grab Bar – Complete Guide
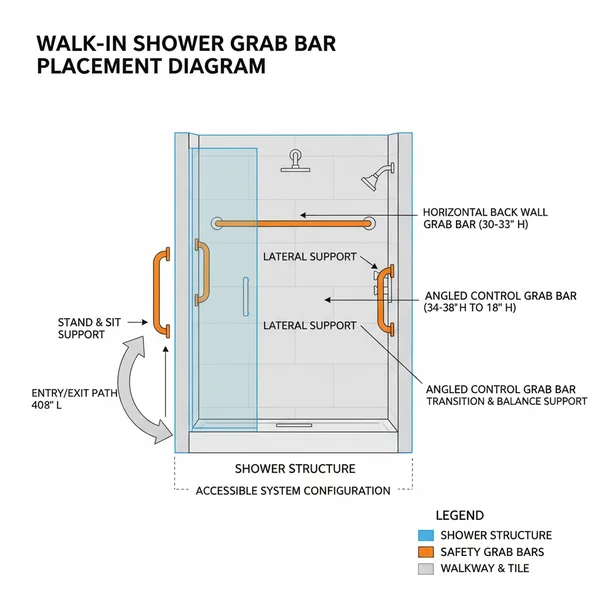
This diagram illustrates the ideal configuration for grab bar placement in a walk-in shower, ensuring maximum safety and accessibility. It details the precise height, angle, and orientation of each essential component to create a secure structure, preventing falls and supporting user independence within the shower system.
📌 Key Takeaways
- Main purpose of this diagram: To illustrate safe and effective grab bar placement for walk-in showers.
- Most important component to identify: The recommended height and angle for each grab bar within the shower layout.
- Safety or critical consideration: Ensuring the structural integrity of the wall for secure grab bar installation.
- Practical application tip: Always verify local building codes and user-specific needs before final installation.
- When to use this diagram: When designing, renovating, or installing grab bars in an accessible walk-in shower system.
Navigating the installation of safety features in your bathroom can feel daunting, especially when it comes to ensuring proper support where it’s needed most. If you’re searching for a definitive resource to enhance the safety and accessibility of your bathing space, you’ve come to the right place. This comprehensive guide provides an invaluable walk in shower shower grab bar placement diagram, meticulously detailing optimal locations and installation considerations. We will break down every aspect, from understanding the visual layout to a step-by-step installation process, empowering you with the knowledge to create a secure and functional shower environment. By the end of this article, you will have a clear understanding of the ideal placement for every grab bar, ensuring maximum safety and peace of mind.
Understanding Your Walk-In Shower Grab Bar Placement Diagram
The provided diagram serves as your essential visual blueprint for safely outfitting your walk-in shower with grab bars. It’s designed to demystify the critical aspects of grab bar placement, showcasing not just where bars typically go, but also the rationale behind these strategic positions. Every component within the diagram is clearly labeled, illustrating ideal heights and orientations crucial for both everyday use and emergency situations. You’ll observe common placements for horizontal, vertical, and even angled grab bars, each serving distinct functional purposes within the shower’s layout.
Typically, the diagram will highlight three primary zones for grab bar installation: the entry/exit point, the back wall (where the shower controls are often located), and the side walls. Horizontal bars are frequently recommended near the showering area for stability while standing or sitting, usually positioned at a height that allows for natural gripping without excessive bending or stretching. Vertical bars are vital near the shower entry and exit, providing support when stepping over a curb or transitioning into the shower space, and they are also critical on side walls near controls for balance. Angled bars can offer a natural hand-over-hand motion, particularly useful for individuals with limited mobility. The diagram’s visual breakdown emphasizes a universal system for enhanced safety, ensuring your grab bar configuration maximizes support and minimizes the risk of falls. Pay close attention to any indicated measurements, as these represent industry-standard best practices for optimal accessibility and user comfort.
While a specific diagram cannot be generated by this text, imagine a visual layout illustrating optimal grab bar positions: A vertical bar near the shower entrance, a horizontal bar on the back wall near controls/seat, and possibly an additional vertical or angled bar on a side wall. All bars are securely anchored into wall studs or blocking, with suggested heights (e.g., 33-36 inches from the floor for horizontal, and varying for vertical/angled for natural reach) clearly marked.
Step-by-Step Guide to Interpreting and Installing Your Grab Bars
/walking-5c7fe61746e0fb000140a51d.jpg)
Successfully installing grab bars in your walk-in shower requires a clear understanding of the diagram and meticulous execution. This step-by-step guide will walk you through interpreting the walk in shower shower grab bar placement diagram and applying its principles to your own bathroom, ensuring a safe and robust installation.
-
✓ Step 1: Assess Your Specific Needs and Shower Layout
Before marking anything, stand in your shower and visualize how you (or the intended user) would naturally reach for support. Consider areas where balance is most critical: stepping in/out, reaching for soap, or changing water temperature. Compare this to the general layout shown in the diagram. Note any unique features of your shower, like a built-in bench or specific faucet configuration, which might influence optimal placement. The goal is to customize the standard diagram to your personal requirements. -
✓ Step 2: Understand Standard Height Guidelines and Bar Types
The diagram typically suggests standard heights. For horizontal grab bars, the common recommendation is 33 to 36 inches from the finished floor to the top of the bar, allowing for a comfortable grip while standing or sitting. Vertical bars are often placed at entry points, extending from around 18 inches to 52 inches from the floor, accommodating varying heights and providing stability when stepping over a threshold. Angled bars can be tailored to the individual’s natural arm swing. Select the appropriate length and type of grab bar (straight, L-shaped, peened for better grip) for each location based on the diagram’s suggestions and your user assessment. -
✓ Step 3: Locate Wall Studs or Install Blocking for Secure Mounting
This is the most critical aspect of installation. Grab bars MUST be anchored into structural supports within the wall—never just into drywall or tile. Use a reliable stud finder to locate wooden or metal studs. If studs are not conveniently located at your desired grab bar positions, you will need to open the wall and install horizontal blocking (wood 2x4s or 2x6s) between studs. This creates a robust backing for your grab bars and is a fundamental part of the grab bar’s support structure. -
✓ Step 4: Mark and Double-Check Placement Accurately
Once studs/blocking are identified, hold the grab bar in its intended position and use a pencil to mark the drilling points for each flange. Use a level to ensure horizontal bars are perfectly straight and vertical bars are plumb. Have the primary user test the proposed placement for comfort and accessibility before drilling. This dry run is invaluable for confirming the optimal configuration. -
✓ Step 5: Drill Pilot Holes and Securely Mount the Grab Bars
Using an appropriate drill bit (e.g., tile bit for ceramic/porcelain, wood bit for studs), drill pilot holes at your marked locations. Ensure the holes are deep enough to accommodate the screws without resistance. Apply silicone caulk around the perimeter of each grab bar flange before fastening it to the wall. This creates a waterproof seal, preventing water intrusion into the wall system. Use stainless steel screws that are long enough to penetrate deeply into the studs or blocking for maximum strength. -
✓ Step 6: Test for Stability and Final Inspection
After installation, firmly pull on each grab bar to ensure it is absolutely secure and shows no signs of movement or flexing. It should feel rock-solid. Check the caulk seal to ensure no gaps remain. A properly installed grab bar should be able to support at least 250 pounds of force, as per ADA guidelines, though residential installations should aim for similar robust structure.
Consider using a piece of painter’s tape to mark the center of your studs before holding up the grab bar. This makes alignment easier and reduces pencil marks on your tile or wall.
Common Issues & Troubleshooting with Grab Bar Installation

Even with a clear walk in shower shower grab bar placement diagram, users can encounter common hurdles during installation or usage. Understanding these issues can prevent safety hazards and prolong the life of your grab bars. One frequent problem is inadequate support, leading to loose or wobbly grab bars. This almost always stems from failing to anchor into a stud or proper blocking. The diagram implicitly highlights areas for structural support, reminding you to verify solid backing.
Another issue is incorrect height or placement, rendering the grab bar ineffective or uncomfortable. For instance, a bar placed too high may be out of reach for a sitting user, while one too low might require excessive bending. The diagram provides crucial height ranges to prevent this. Warning signs to look for include any movement when pressure is applied, cracks appearing in the surrounding grout or tile, or visible rust indicating moisture intrusion or poor material quality. If you notice any of these, immediately investigate and rectify the situation. Ignoring a loose grab bar can lead to serious injury. When facing complex wall materials (like concrete or hollow tile) or if you are unsure about locating studs or installing proper blocking, it’s always best to seek professional help from a licensed contractor or accessibility specialist. Their expertise ensures the system is installed correctly and safely.
Never attempt to install a grab bar without confirming solid structural support (studs or blocking) behind the wall surface. Fastening into drywall or thin tile alone is extremely dangerous and will not support human weight, leading to potential catastrophic failure.
Tips & Best Practices for Your Walk-In Shower Grab Bars
Beyond the basic installation, a few expert tips and best practices can significantly enhance the functionality, longevity, and safety of your grab bar system. Following these recommendations ensures your investment in safety truly pays off.
- ✓ Test Placement with the User: Before drilling, have the primary user of the shower simulate using the grab bars. This “dry run” ensures the height, angle, and specific configuration are comfortable and effective for their unique needs, especially important if mobility limitations are a factor.
- ✓ Consider Future Needs: Even if current users are fully mobile, consider potential future needs. Installing grab bars with foresight can reduce the need for future renovations, making your shower accessible for years to come. This might mean adding an extra bar or ensuring a robust structure that can support more complex arrangements later.
- ✓ Choose Contrasting Colors: For individuals with visual impairments, a grab bar that contrasts in color with the shower wall can significantly improve visibility and ease of use. This simple design choice is a key accessibility feature.
- ✓ Regular Maintenance Checks: Periodically (e.g., every six months), test all grab bars by applying firm pressure. Check for any looseness, rust, or damage to the bar itself or the surrounding wall material. Re-caulk if any seals appear compromised to prevent water damage.
- ✓ Invest in Quality Components: While tempting to save money, always opt for grab bars made of high-quality materials like stainless steel. Look for certifications (e.g., ADA compliance) to ensure the component meets rigorous safety standards. Knurled or textured grips offer superior hold, especially with wet hands.
- ✓ Cost-Saving Advice: If you’re confident in your DIY skills, installing grab bars yourself can save on labor costs. However, prioritize safety over savings. Purchase grab bars from reputable suppliers; often, buying a set rather than individual bars can offer better value.
For added versatility and future adaptation, consider installing additional blocking during any shower renovation. This “future-proofs” your walls, making it effortless to add or reposition grab bars without extensive demolition later.
Conclusion
Ensuring safety and accessibility in your bathroom, particularly in a walk-in shower, is paramount. By leveraging this comprehensive guide and the detailed walk in shower shower grab bar placement diagram, you are now equipped with the essential knowledge to make informed decisions about your installation. From understanding the optimal layout and selecting the right component to executing a secure installation and maintaining your grab bars, every aspect has been covered. Prioritizing correct placement and robust anchoring not only prevents potential accidents but also significantly enhances the comfort and independence for all users. Take the steps outlined here to transform your shower into a truly safe and accessible space, ensuring peace of mind for years to come.
Frequently Asked Questions
What is walk-in shower grab bar placement diagram?
A walk-in shower grab bar placement diagram is a visual guide illustrating the optimal layout and configuration for installing grab bars within a shower space. It details specific dimensions, heights, and angles for each safety component, ensuring proper structure and maximum support. This diagram is crucial for designing accessible and safe bathroom systems for all users.
How do you read walk-in shower grab bar placement diagram?
To read this diagram, first identify the shower’s overall structure and its key components like walls and showerheads. Then, locate the specified dimensions and recommended positions for each grab bar, often marked with measurements and arrows. Pay attention to the type of grab bar indicated and its intended layout within the system for optimal safety configuration.
What are the parts of walk-in shower grab bar placement?
The main parts involved in walk-in shower grab bar placement include the vertical grab bar (typically near the shower controls), horizontal grab bars (on long walls), and angled grab bars (often at entry points or corners). Each grab bar is a critical component of the overall safety structure, and their precise layout, as shown in the diagram, forms the complete accessible system.
Why is grab bar placement important?
Correct grab bar placement is paramount for user safety and independence, particularly in wet and slippery shower environments. Improper component layout can render grab bars ineffective or even hazardous. Following a diagram ensures the grab bar system provides reliable structural support exactly where needed, preventing falls and facilitating a comfortable, secure bathing configuration for individuals with mobility challenges.
What is the difference between horizontal and vertical grab bars?
Horizontal grab bars primarily provide support for balance and standing, offering a stable component to lean on or hold. Vertical grab bars assist with standing up or sitting down, aiding in transitions by allowing an upward or downward pull. The optimal layout often integrates both types, creating a comprehensive safety structure and system that addresses different user movements and needs effectively.
How do I use walk-in shower grab bar placement diagram?
Use the diagram as a blueprint for your shower’s safety configuration. First, measure your shower space and compare it to the diagram’s layout. Then, mark the exact component placement on your walls according to the specified heights and distances. Ensure the underlying structure can support the grab bars before installation. This diagram guides a safe and compliant system setup.